


Patch Lead - Male 4 Pin Aviation connector to splice in to existing reversing camera cable | CAB041
The 4-pin Aviation Male Connector Patch Lead / Splice Lead allows you to add a 4-pin reversing camera to a system with unusual connectors for which you cannot find an adaptor. This cable splits to the internal wires to allow you to solder them on to your old extension cable.
About our Male 4 Pin Aviation connector to splice in to existing reversing camera cable
We often get people with an old reversing camera system wishing to install a replacement one. Usually, the old systems will use either a proprietary connector or, more commonly, a connector such as a PS/2 or S-Video, which has been re-purposed to carry power in an unknown pin-out configuration. In these cases, this product is ideal, as it allows a more modern 4-pin aviation connector reversing camera to be added. This cable is 100cm in length.
Please note the following instructions for adding a lead to your existing wiring:
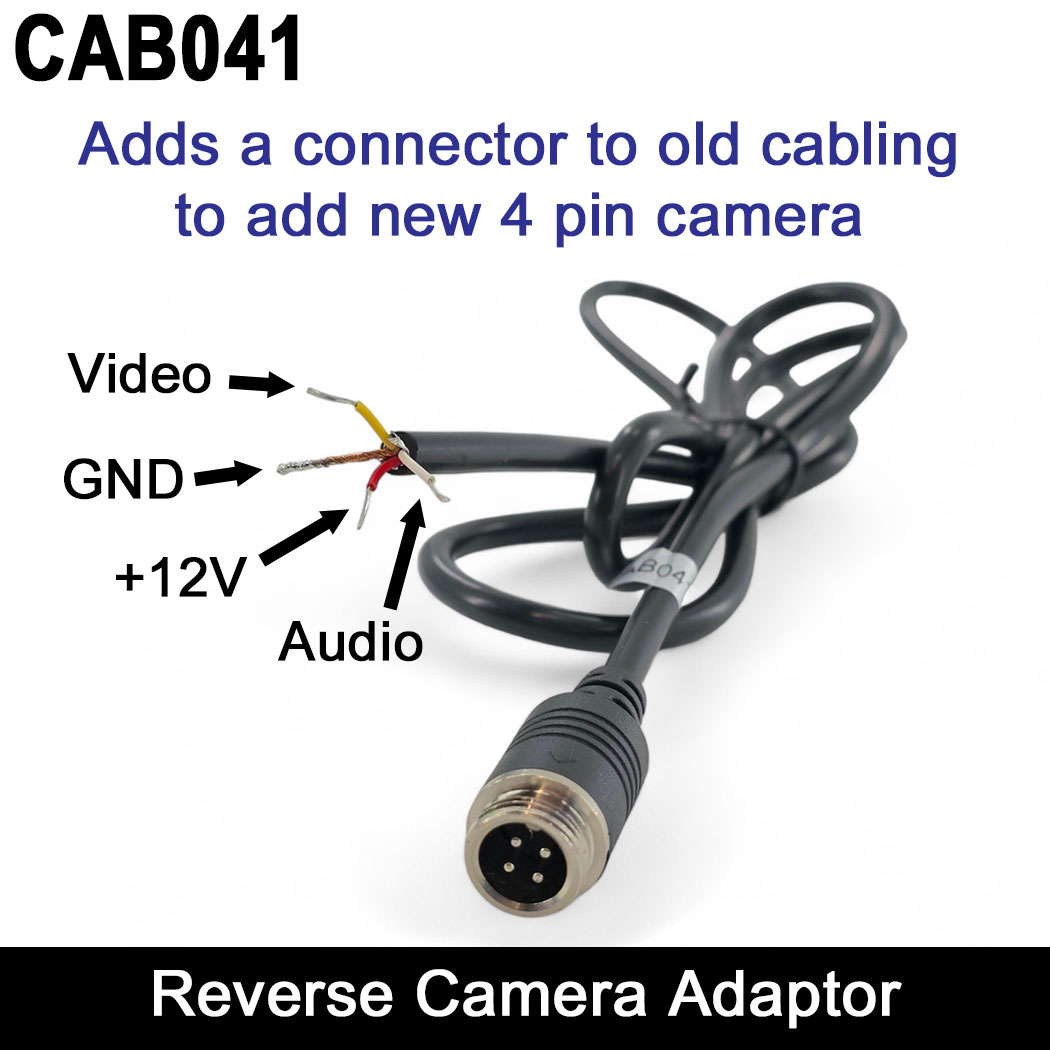
The red wire is for powering +12V's device. The twisted copper braiding is the earth, which can be twisted together and soldered to this wire if your old video signal cable has twisted braiding around it. The white wire is for audio, but it can be left unconnected in most cases as most cameras don't have a microphone. The yellow wire is for the video signal.
Suppose you have checked our adaptors for reversing cameras page and can't find anything to fit your system; you can upgrade your connector to the more modern style used in cameras like ours using this patch lead. You will need the following tools: a multimeter, wire cutter/stripper, insulation tape or heat shrink, soldering iron, soldering gun, and 1M 4-pin cable to bare wires (this listing).
Warning: Do not cut the wires to the new camera as this may allow atmospheric moisture to enter down the cable and wire colours will be different from the advice on this page. Never cut the extension cable while there is power to the camera system, as this may cause a short. Never just put the same colour to the same colour - as colours don't always match the function of the wire.
Follow these steps to connect the lead to your existing wiring:
1. Ensure that the power is dead to the system and cut the old connector off on the main extension wire (not the camera cable, as this often has extra wires and no screening).
2. Separate the wires so they aren’t touching each other.
3. Power up the system by turning the monitor on.
4. Use your multimeter to determine which wire(s) carry power (usually just one - but occasionally more) and note the colour down (do not assume colours follow convention - we have seen lots of colours used for various purposes).
5. Remove power from the system so that you can make your connections.
6. Connect the red wire on our cable to the coloured wire you identified as +12V on your existing wiring (solder is the gold standard). A positive power supply is the only wire that can cause damage if you get it around the wrong way, so please be careful.
7. With luck, you will find a wire with shielding on your main extension cable. This should be the video signal cable. Connect this with the video cable on the new lead (the yellow wire). The shielding from the old signal wire can be twisted together with your earthed cable shielding on the new cable. Insulate the connections made.
8. If you power the system now, you might find the camera works already (because many systems link the earth screening up with the main earth in the connector). If it doesn't, you must identify the earth cable by touching the remaining spare wires in your old cable (ensure none are positive first) against the earth/screening on the new connection cable until you get a picture on the screen.
9. If your camera has sound (we only stock a few that do) and your monitor has a speaker, you can enable sound by attaching the white wire from our cable. You must touch it against the spare wires on your cable until you find one giving you audio.
10. Tidy up your wiring, ensuring all the wires are well-soldered and insulated.
11. Congratulations, the job is done! It's time to put the kettle on.
Mainland UK Shipping
We have three postage options to select from during checkout (on larger items eg kits there will be two options):
Royal Mail Tracked - Smaller / Lighter weight orders. This will be sent via Royal Mails Tracked Service. They will send emails/SMS to inform you of the tracking events. This option won't be shown for heavier weight orders.
DPD 2 Day. Small or large orders. This will be sent with DPD Local and should arrive within two working days (if you place the order before 12:30PM).
DPD Next Day. Small or large orders. This will be sent with DPD Local and should arrive the following working day (if you place the order before 12:30PM).
Highlands and Islands UK Shipping
We offer a 2-3 day service fulfilled with either Royal Mail Post, or Parcel Force. The prices charged are identical to mainland UK. Small orders will be sent via the post, larger orders via Parcel Force.
Outside of the UK Shipping
We shop around when selecting the best method for Europe (we avoid the cheap budget couriers due to parcels being lost). Southern Ireland is always sent via DPD. Other countries will usually be either Parcel Force, UPS, or Fedex. Please note that we require a phone number for international deliveries. Also if you are a company in Europe, a VAT number or EORI number will help speed up customs.
We remove the UK VAT (Tax) when any country other than the UK is selected in the shopping basket or checkout. From this point all prices on the site drop down to exclude VAT. If you are from the Channel Islands, please select Jersey / Guernsey from the country list in order to remove UK sales Tax.
60 day "Change of Mind" policy
We understand that for whatever reason you may need to return your purchase. We provide a 60 day opportunity for you to do just that. Simply give us an email or a phone call to let us know it is due back. You are responsible for the shipping back to us but you will receive a full refund including the original shipping we charged you for your order. We recommend getting a signed for or proof of postage when posting back to us.
All we ask is that you return the items in the condition they were sent in, with the packaging present. You are welcome to have temporarily tested the product and unravelled things, but if you have cut wires, soldered, glued, installed and used for a while then this wouldn't be suitable for returns under the change of mind policy.